TortoiseGit

TortoiseGit은 깃 버전 관리 클라이언트의 하나로, 파일 탐색기로 구현되어 있고 TortoiseSVN에 기반을 둔다. GNU 일반 공중 사용 허가서로 출시되는 자유 소프트웨어


Tortoise Git을 사용하기 위해선 Git을 설치해야한다.

https://gitforwindows.org/


Git for Windows

Git for Windows focuses on offering a lightweight, native set of tools that bring the full feature set of the Git SCM to Windows while providing appropriate user interfaces for experienced Git users and novices alike. Git BASH Git for Windows provides a BA

gitforwindows.org


TortoiseGit 사이트에 접속한다.
자신의 Windows 환경에 맞게 32-bit 또는 64-bit을 선택하여 다운로드 받는다.
TortoiseGit 설치 파일과 언어팩은 함께 받는다.


Download – TortoiseGit – Windows Shell Interface to Git

Other resources Debug symbols, language dlls and other resources can be found on our dedicated download server: download.tortoisegit.org/tgit/2.12.0.0/. Preview releases The preview releases are built from the latest code that represents the cutting edge o

tortoisegit.org


반응형

폴더블 폰 모바일웹 브라우저 해상도 정보

기종 Viewport
화면 사이즈 (W x H)
해상도 Phys. (W x H) 인치 DPR
(Device Pixel Ratio)
 Galaxy Flip4  412 x 1006 1081.5 x 2640.75    
 Galaxy Flip3   384 x 939  1080 x 2640
 260 x 512
6.7 2.8125
 Galaxy Flip2  

6.7  
 Galaxy Flip  412 x 1004  1080 x 2636
 112 x 300

6.7
 
 Galaxy Z Fold3  접힌화면 320 x 872
 넓은화면 674 x 842
 접힌화면 840 x 2289
 넓은화면 1769.25 x 2210.25
  2.625
 Galaxy Z Fold2  884 x 1104  1768 x 2208 7.6 2
 Galaxy Fold  768 x 1076  1536 x 2152 7.3 2


반응형

특정 CSS문제가 생기지 않도록 하는 스니펫 콜렉션

이미지 늘려짐/찌그러짐 방지

object-fit: cover;


Flexbox 줄바꿈

flex-wrap: wrap;


고정 높이 -> height 보다는 min-height ,고정 너비 -> width  보다는 min-width 사용

min-width: 320px;
min-height: 980px;


CSS 변수 폴백 값 주기

max-width: calc(100% - var(--actions-width, 70px));


줄바꿈 되지 않아야할 긴 콘텐츠 

text-overflow: ellipsis; white-space:nowrap; overflow: hidden;


스크롤 연쇄 잠금

overscroll-behavior-y: contain;


배경 반복 제거

background-repeat: no-repeat;


필요할때만 스크롤바 보이기

overflow-y: auto;


스크롤바 생길때 레이아웃 변화 없애기

scrollbar-gutter: stable;


Flexbox 에서 최소 콘텐츠 사이즈 지정

min-width: 0; /*기본값이 auto 여서 overflow 발생*/


CSS Grid에서 최소 콘텐츠 사이즈 지정 minmax() 사용

Flexbox 아이템 배열시 justify-content: space-between; 대신 gap: 1rem; 사용

gap: 1rem;


이미지 최대 넓이 지정

max-width: 100%


이미지 위에 하얀 텍스트 올리때 이미지 로딩 실패시 대응

background-color: grey;


- 버티컬 미디어 쿼리 활용 → position:sticky 같은거 쓸 때 특정 세로크기 이상에서만 적용 @media (min-height:600px) {}
- CSS Grid 위에서 고정 값 사용은 조심 → 항상 미디어 쿼리 사용할 것
- CSS Grid 사용시 Auto Fit vs. Auto Fill → 대부분의 경우 auto-fill 이 나음
- 그리드 컨테이너 차일드에 postition: sticky 사용시 align-self: start 적용
- 그룹 셀렉터 지정은 다른 브라우저에서는 안될수 있으니 각각으로 분리할 것


https://developer.mozilla.org/ko/docs/Web/CSS/var() 


var() - CSS: Cascading Style Sheets | MDN

CSS var() 함수는 사용자 지정 속성 (en-US), 또는 "CSS 변수"의 값을 다른 속성의 값으로 지정할 때 사용합니다.

developer.mozilla.org

A Complete Guide to Flexbox

https://css-tricks.com/snippets/css/a-guide-to-flexbox/


A Complete Guide to Flexbox

Our comprehensive guide to CSS flexbox layout. This complete guide explains everything about flexbox, focusing on all the different possible properties for the parent element (the flex container) a…

css-tricks.com


Best CSS Code Snippet Sites

https://css-tricks.com/snippets/


Code Snippets

Visit the post for more.

css-tricks.com

https://snipplr.com/


Code Snippet - Snipplr Social Repository


snipplr.com

https://stackoverflow.com/questions/tagged/css


Newest 'css' Questions

Stack Overflow | The World’s Largest Online Community for Developers

stackoverflow.com


본문 참고 https://news.hada.io/topic?id=5512 


방어적(Defensive) CSS | GeekNews

특정 CSS문제가 생기지 않도록 하는 스니펫 콜렉션- Flexbox 줄바꿈 → flex-wrap: wrap;- 여유 공간 주기 → margin-right: 1rem;- 줄바꿈 되지 않아야할 긴 콘텐츠 → text-overflow: ellipsis; white-space:nowrap; overflow:

news.hada.io


반응형

jQuery 사용하여 이중탭 구현


html

<div class="login">
  <!-- contents -->
  <div class="container">
    <div class="tit-box">
        <h2>로그인 폼</h2>
    </div>
  	<div class="tabonoff content-wrap">
      <!-- 탭메뉴 -->
      <ul id="tabMenu" class="jq_tab tab-menu">
        <li>
          <a href="javascript:void(0);" class="tit"><span>A 타입</span></a>
        </li>
        <li>
          <a href="javascript:void(0);" class="tit"><span>B 타입</span></a>
        </li>
      </ul>
      <!-- //탭메뉴 -->
      <div class="cont-wrap">
      <!-- 탭1_설치 -->
      <div class="tab-cont">
        <div class="tabonoff sub-tabs">
          <!-- dots_indicator -->
            <div class="dots">
              <a href="javascript:void(0);" class="on"></a>
              <a href="javascript:void(0);"></a>
              <a href="javascript:void(0);"></a>
            </div>
          <!-- //dots_indicator -->

        <!-- 서브_탭메뉴 -->
        <ul class="jq_tab jq_stabMenu stab-menu">
          <li class="active"><a href="javascript:void(0);" class="tit">ID/PW</a></li>
          <li><a href="javascript:void(0);" class="tit">로그인2</a></li>
          <li><a href="javascript:void(0);" class="tit">로그인3</a></li>
        </ul>
        <!-- //서브_탭메뉴 -->
      	<div class="cont-wrap cont-box">
            <!-- IDPW_탭1_1-->
            <div class="tab-cont">
                <div class="form-group">
                    <div class="input-box">
                        <div class="input">
                            <input type="text" title="아이디 입력" placeholder="아이디">
                        </div>
                        <div class="input">
                            <input type="password" title="패스워드 입력" placeholder="패스워드 입력">
                        </div>  
                    </div>
                  <div class="btn-wrap w100p">
                    <button class="id_loginCheck btn-sblue" type="button">로그인</button>
                  </div>
                  <div class="desc">
                    <p>※ 할당받은 ID를 입력하시면 로그인이 됩니다.</p>  
                  </div>
                </div>
            </div>
            <!-- //IDPW_탭1_1 -->
            <!-- 탭1_2 -->
            <div class="tab-cont">
              <div class="form-group">
              <div class="input-box pd">
                <div class="input">
                    <input type="text" title="사용자ID / 이메일" placeholder="사용자ID / 이메일">
                </div> 
                </div>
                <div class="btn-wrap">
                  <button class="id_register_fido btn-navy" type="button">등록</button>
                  <button class="id_loginCheck btn-sblue" type="button">로그인</button>
                  <button class="id_delete btn-gray" type="button">해지</button>
                </div>
                <div class="desc">
                    <p>※ 할당받은 ID를 입력하고 등록하시면 로그인이 됩니다.</p>  
                </div>
                </div>
            </div>
            <!-- //탭1_2 -->

        	<!-- 탭1_3 -->
        	<div class="tab-cont">
          		<div class="form-group">
                    <div class="input-box">
                        <div class="input">
                            <input type="text" title="아이디 입력" placeholder="아이디">
                        </div>
                      <div class="input">
                          <input type="password" title="패스워드 입력" placeholder="패스워드 입력">
                      </div>  
                    </div>
                    <div class="btn-wrap">
                      <button class="id_register_motp btn-navy" type="button">등록</button>
                      <button class="id_loginCheck btn-sblue" type="button" >로그인</button>
                      <button class="id_delete btn-gray" type="button">해지</button>
                    </div>
                	<div class="desc">
                    	<p>※ㅎㅎㅎ</p>  
                	</div>
                  </div>
                </div>
        		<!-- //탭1_3 -->
    			</div>
    		</div>
    	</div>
    	<!-- //탭1_설치 -->
    	<!-- 탭2_미설치 -->
    	<div class="tab-cont">
    		<div class="tabonoff sub-tabs">
              <!-- dots_indicator -->
              <div class="dots">
                <a data-dot="dot1" href="javascript:void(0);" class="on"></a>
                <a data-dot="dot2"  href="javascript:void(0);"></a>
                <a data-dot="dot3"   href="javascript:void(0);"></a>
              </div>
                <!-- //dots_indicator -->
                <!-- 서브_탭메뉴 -->
                <ul class="jq_tab jq_stabMenu stab-menu">
                  <li class="active"><a href="javascript:void(0);" class="tit">ID/PW</a></li>
                  <li><a href="javascript:void(0);" class="tit">FIDO2</a></li>
                  <li><a href="javascript:void(0);" class="tit">MOTP</a></li>
                </ul>
                <!-- //서브_탭메뉴 -->

                <div class="cont-wrap cont-box">
                    <!-- 탭2_1 -->
                    <div class="tab-cont">
                      <div class="form-group">
                        <div class="input-box">
                          <div class="input">
                              <input type="text" title="아이디 입력" placeholder="아이디">
                          </div>
                          <div class="input">
                              <input type="password" title="패스워드 입력" placeholder="패스워드 입력">
                          </div>  
                        </div>
                        <div class="btn-wrap w100p">
                            <button class="id_loginCheck btn-sblue" type="button">로그인</button>
                        </div>
                        <div class="desc">
                            <p>※ 할당받은 ID를 입력하시면 로그인이 됩니다.</p>  
                        </div>

                      </div>
                    </div>
                    <!-- //탭2_1 -->

                    <!-- 탭2_2-->
                    <div class="tab-cont">
                      <div class="form-group">
                        <div class="input-box pd">
                          <div class="input">
                              <input type="text" title="사용자ID / 이메일" placeholder="사용자ID / 이메일">
                          </div>
                        </div>
                        <div class="btn-wrap">
                          <button class="id_register_fido btn-navy" type="button" >등록</button>
                          <button class="id_loginCheck btn-sblue" type="button" >로그인</button>
                          <button class="id_delete btn-gray" type="button" >해지</button>
                        </div>
                        <div class="desc">
                          <p>※ sdd</p>  
                        </div>
                      </div>
                    </div>
                    <!-- //탭2_2 -->

      				<!-- 탭2_3 -->
      				<div class="tab-cont">
      					<div class="form-group">
                          <div class="input-box">
                            <div class="input">
                                <input type="text" title="아이디 입력" placeholder="아이디">
                            </div>
                            <div class="input">
                                <input type="password" title="패스워드 입력" placeholder="패스워드 입력">
                            </div>  
                          </div>
                          <div class="btn-wrap">
                            <button class="id_register_motp btn-navy" type="button" >등록</button>
                            <button class="id_loginCheck btn-sblue" type="button" >로그인</button>
                            <button class="id_delete btn-gray" type="button" >해지</button>
                          </div>
                          <div class="desc">
                            <p>※ aaaaa </p>  
                          </div>
      					</div>
    				</div>
    				<!-- //탭2_3 -->
  					</div>
  				</div>
  			</div>
  			<!-- //탭2_미설치 -->                 
  		</div>                      
  	</div>
  </div>
  <!-- //contents -->
</div>


script

<script>
$(document).ready(function(){
        
    // 이중탭
    $(".tabonoff > .cont-wrap").children().css("display", "none"); 
    $(".tabonoff > .cont-wrap div:first-child").css("display", "block");
    $(".tabonoff > .jq_tab li:first-child").addClass("on"); 

    $(".tabonoff").find(".jq_tab > li").on("click", function() { 
        var index = $(this).parent().children().index(this);
		
        $(this).siblings().removeClass();
        $(this).addClass("on");
       // console.log($(this).parent().children());
        $(this).parent().next(".cont-wrap").children().hide().eq(index).show();
    });

     // 설치/미설치 탭메뉴 이미지교체 
     $("#tabMenu > li").click(function(){
        var $this = $(this);
        $("#tabMenu > li").each(function(idx){
            var $li = $(this);
            $li.find("img").attr("src", $(this).find("img").attr("src").replace("_on","_off"));
        });
        $this.find("img").attr("src", $this.find("img").attr("src").replace("_off","_on"));
    });   

	// 서브_탭메뉴 > Dot Indicator 연결
	$(".jq_stabMenu li > a").on("click", function() {
		var index = $(this).parent().index();
		$(this).closest(".tabonoff").find(".dots > a").removeClass("on");
		$(this).closest(".tabonoff").find(".dots > a").eq(index).addClass("on");
	});
   
    //  Dot Indicator > 서브_탭메뉴 연결
    $(".dots > a").click(function(){
        var dotIndex = $(this).parent().children().index(this); 
        $(this).siblings().removeClass();
        $(this).addClass("on");
        // console.log(dotIndex); 
        $(this).closest(".tabonoff").find("li").eq(dotIndex).trigger("click");	
    });

    // '로그인'버튼 클릭이벤트
    $(".id_loginCheck").click(function(){
        location.href="./sub-main.html"
    });
    

});
</script>

css

.login .container{width:1280px; /*margin:0 auto;*/ margin-top:100px; margin-bottom:160px;}
.login .tit-box{margin-bottom:56px;}
.login .tit-box p{font-size:36px; color:#797979; margin-bottom:20px;}
.login .tit-box h2{font-size:60px; font-family:'NotoM';}

.login .content-wrap{display:block; clear:both;*zoom:1; width:1024px; margin:0 auto;}
.login .content-wrap:after{display:block; height:0;content:".";font-size:0;visibility:hidden;clear:both;}
.login .content-wrap .form-group{width:582px; margin:0 auto;}
.login .content-wrap>.tab-conts{display:block; float:left; width:100%;clear:both;color:#fff; width:1024px;}
.login .content-wrap .tab-menu{position:relative; width:440px; margin:0 auto; height:40px;}
.login .content-wrap .tab-menu::after{display:block; content:''; width:1px; height:36px; background:#b7b7b7; position:absolute; top:0; left:50%; transform:translateX(-50%);}
.login .content-wrap .tab-menu li::before{display:block; content:''; clear:both;}
.login .content-wrap .tab-menu li{float:left; width:45%; height:44px; font-size:30px; vertical-align:middle; font-family:'NotoM'; color:#a2a3a3;}
.login .content-wrap .tab-menu li:first-of-type{margin-right:5%;}
.login .content-wrap .tab-menu li:last-of-type{margin-left:5%;}
.login .content-wrap .tab-menu li.on{color:#2b2e38;}
.login .content-wrap .tab-menu li a{display:block; width:100%; text-align:center;}
.login .content-wrap .tab-menu li a img{vertical-align:middle;}
.login .content-wrap .tab-menu li:first-of-type a img{margin-right:15px;}
.login .content-wrap .tab-menu li:last-of-type a img{margin-left:20px;}
.login .content-wrap .tab-menu li a span{vertical-align:middle;}
.login .sub-tabs{display:block; clear:both; *zoom:1; padding:0 50px; /*margin-top:20px;*/ position:relative;}
.login .sub-tabs .stab-menu{width:800px; margin:0 auto; height:68px; padding:0 50px;}
.login .sub-tabs .stab-menu li::before{display:block; content:''; clear:both;}
.login .sub-tabs .stab-menu li{float:left; width:33.33%; height:66px;font-size:30px; color:#bec2c7; font-family:'NotoM';}
.login .sub-tabs .stab-menu li a{display:block; padding:20px 0;}
.login .sub-tabs .stab-menu li.on{color:#2b2e38; border-bottom:3px solid #2b2e38;}

.login .cont-box{position:relative; width:900px; margin:0 auto; border:1px solid #b7b7b7; height:420px;}

.login .form-group .btn-wrap{width:456px; margin:0 auto; margin-top:24px;}
.login .form-group .btn-wrap::after{display:block; content:''; clear:both;}
.login .form-group .btn-wrap button{width:148px; float:left;}
.login .form-group .btn-wrap button{color:#fff; font-size:26px; font-family:'NotoM'; padding:32px 0; line-height:1;}
.login .form-group .btn-wrap button + button{margin-left:6px;}
.login .form-group .btn-wrap.w100p{width:360px;}
.login .form-group .btn-wrap.w100p button{width:100%;}

.login .input-box{width:360px; margin:0 auto; margin-top:52px;}
.login .tab-cont .input-box.pd{padding:28px 0 10px 0;}

.login .input-box .input + .input{margin-top:14px;}
.login .input-box input{font-size:28px; /* padding:9px 12px;*/ width:100%; line-height:1; background:#fff; border-radius:0px; border:0; border-bottom:1px solid #cccccc; height:52px;}

.login .input-box input:focus, 
.login .input-box select:focus, 
.login .input-box select:focus{outline:1px solid transparent;}
.login .form-group .desc{font-size:20px; font-family:'NotoR'; color:#a1a2a4; margin-top:24px; line-height:1.1;}
.login .tab-cont{position:relative;}
.login .tab-cont .dots{width:100%; position:absolute; bottom:-40px; left:50%; transform:translateX(-50%);}
.login .tab-cont .dots a{display:inline-block; width:10px; height:10px; border-radius:50%; background:#c3cacf; transition:all .3s ease-in-out;}
.login .tab-cont .dots a.on{background:#428bf2;border-radius:50px; width:24px;}
.login .tab-cont .dots a + a{margin-left:12px;}
.login .content-wrap .tab-menu{margin-bottom:24px; margin-bottom:20px;}
.login .content-wrap .tab-menu{width:520px;}
.login .content-wrap .pt{padding-top:24px;}


반응형

'Librarys > Tabs' 카테고리의 다른 글

이중탭 레퍼런스  (0) 2019.05.28
탭(이중탭) 예제  (0) 2019.05.27

Vue Router 

NPM (Install)

// vue-cli 3.x 이상 
npm install vue-router@next
// vue-cli 2.x 
npm install vue-router --save 		// dependencies
or
npm install vue-router --save-dev 	// devDependencies
dependencies와 devDependencies의 차이는 다음과 같습니다.
"dependencies": 프로덕션 환경에서 응용 프로그램에 필요한 패키지.
"devDependencies": 로컬 개발 및 테스트에만 필요한 패키지.

main.js

  • vue-cli 3.x 이상
// main.js

import { createApp } from 'vue'
import App from './App.vue'
import router from './routes/index.js';

const app = createApp(App);

app.use(router);
app.mount('#app');
  • vue-cli 2.x 이상
// main.js

import Vue from 'vue'
import VueRouter from 'vue-router'

Vue.use(VueRouter)

routes/index.js

  • vue-cli 3.x 이상
// routes/index.js

import { createWebHistory, createRouter } from 'vue-router';

const routes = [
  {
    path: "/",
  },
 
];

const router = createRouter({
  history: createWebHistory(),
  routes,
});

export default router;


https://router.vuejs.org/installation.html#vue-cli


Installation | Vue Router

Installation Direct Download / CDN https://unpkg.com/vue-router/dist/vue-router.js (opens new window) Unpkg.com (opens new window) provides npm-based CDN links. The above link will always point to the latest release on npm. You can also use a specific vers

router.vuejs.org


반응형

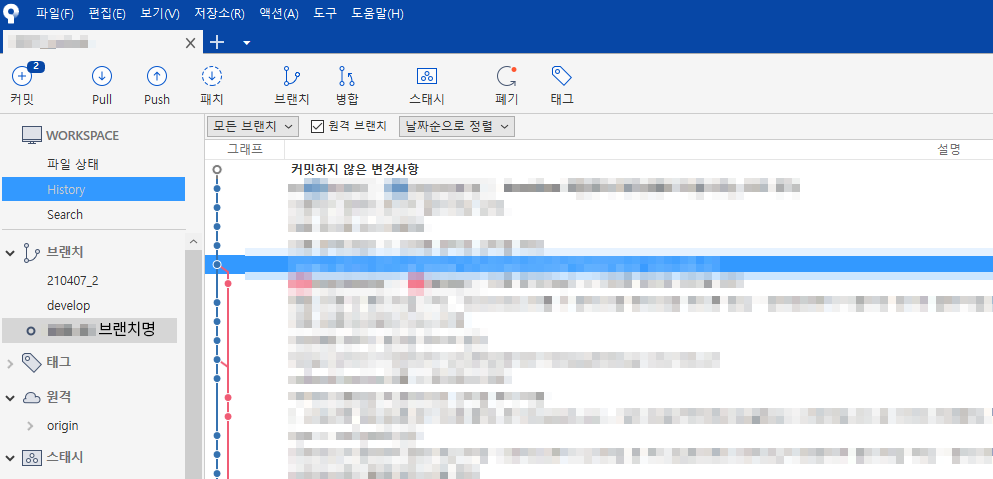
커밋 Commit

현재 작업공간의 상태를 커밋으로 만들어서 저장소에 저장한다.

  • 파일상태에서 변경사항 확인하여 커밋
  • 주황아이콘  → 수정(변경)된 파일
  • 보라아이콘  → 새로 추가된 파일
  • 수정 및 추가된 파일들만 확인/선택*하여  선택내용스테이지 올리기 버튼 클릭
  • 메모란에 [지라코드] 입력 및 상세 코멘트 작성 후 '커밋' 버튼 클릭
  • 완료 되면 상단 'Push (푸시)' 클릭  > develop 체크확인 > 확인 버튼 클릭

푸시 Push

커밋 이후 Push에 업데이트된 숫자가 올라간다 Push까지 눌러줘야 원격저장소에 커밋이 완료됨.


풀 Pull

개발자가 커밋한 추가 변경사항을 받는다.

상단 '풀' 버튼 클릭 
소스커밋 전 변경된 사항이 있는지 꼭 확인하기 (변경된 사항이 있을 경우 아래 스태시 방법 사용하기)


본인이 로컬에서 수정한 동일파일이 존재할 경우 충돌이 생길 수 있다.
스태시를 통해 백업을 하거나 불필요한 수정내역일경우 해당파일은 폐기ㅎ한 후 Pull다운을 받는다. 

스태시 (Stash)  

로컬에서 작업한 소스를 임시로 다른곳에 백업(저장)해 놓는 기능
현재 로컬에서 작업중인 소스와 Pull다운 받아야할 변경된 사항과 겹칠때 유용하다.

  • 커밋하지 않은 변경사항(로컬에서 작업한소스)  백업하기
    1. 커밋하지 않은 채로 스태시 버튼 클릭
    2. 스태시 이름을 정해주고 확인 클릭 (스태시 이름은 헷갈리지 않도록 항상 다르게 !) 
    3. 스태시 목록이 생성됨. 스태시 하위에 내가 저장한 목록 확인
    4. 백업한 파일은 생성된 스태시목록에서 확인할 수 있음
    5. 숫자 클수록 최근 백업한 파일, 구버전일 경우 숫자없음(파일명으로 확인)
    6. 작업상태 초기화됨

  • Pull 버튼을 눌러 최신 소스 받기
    • 최신 개발소스 받은거 확인하기
  • 스태시에 백업했던 소스 복구하기
    • 스태시 목록 중 복구할 내용선택 후  우클릭  > 스태시 적용 클릭 > 작업상태로 돌아감
    • 정상적으로 Merge됨

※ 기타용어
원격 (Origin)  : 서버 저장소
브랜치: 로컬 저장소


브랜치 (Branch) 

원격 (origin) 목록 > 이동할 브랜치(HUB-45) 더블클릭 > 새 브랜치 체크아웃창에서 '확인'버튼 클릭 > 브랜치 목록에 HUB-45 생성됨을 확인

이동 전 브랜치에서 소스파일 수정이 됬을 경우 충돌이 일어남 
스태시를 통해 백업을 하거나 불필요한 커밋내용일경우 폐기처리 후 브랜치 이동


원격 (origin) 목록 > 이동할 브랜치 더블클릭


확인버튼클릭


결과


반응형

로컬호스트 모바일 접속 세팅

인터넷연결된 환경에서의 데스크탑 로컬호스트(localhost.com:8080) 모바일기기 접속 방법은 간단하나

인터넷연결이 안된 폐쇄망에서는 유무선 공유기를 통해 부가적인 세팅이 필요하다. 


(PC 로컬호스트와 모바일접속 연결하기 위한 로컬서버 구축에 대한 내용)

로컬호스트 (모바일 접속)를 위한 로컬서버구축


사용된 기기 : 
유선랜카드 (ipTIME U1G), 유무선공유기 (ipTIME604 Plus-i)

1. ipTIME 홈페이지에서 필요한 유틸 다운로드하여 Wifi 상태확인 (ex: ipTIME_MediaTek_Setup 설치파일)


2. 유무선 공유기 (ipTIME604 Plus-i) 전원 연결 후 기기 초기화(Reset)

3. 유선랜카드 USB(EFM ipTIME U1G)를 PC에  USB포트에 연결, 유무선 공유기와 랜선 연결


4. PC에서 http://192.168.0.1 접속 (iptime 초기 로그인화면 접속되면 성공)

5. ID: admin / PW: admin 로그인 > 관리도구

6. 관리도구 > 기본설정 > 무선설정/보안

7. 네트워크이름(SSID), 암호화 WPA2PSK + AES(권장) 선택, 네트워크 암호 설정 후 적용

8. 모바일에서 설정해준 WIFI로 연결한 후 http://192.168.0.XX 접속하기


반응형


Vue CLI 2.x 버전 vs Vue CLI 3.x 버전 이상

Vue Cli 설치 명령어

CLI 2.X

  • webpack , webpack-simple, browserify, browserify-simple, simple 
npm install -g vue/cli


CLI 3.X

npm install -g @vue/cli

vue 프로젝트 생성

CLI 2.X

vue init [project_template_name] [project directory path]


CLI 3.X

vue create [project_name]

웹팩 설정파일

CLI 2.X

노출 O
show explicit, ex) webpack.config.js


CLI 3.X

노출 X
no show

라이브러리 추가

CLI 2.X

github 템플릿 다운로드


CLI 3.X

plugin 기반으로 기능 추가

실행화면

CLI 2.X

vue cli 2버전 실행화면

CLI 3.X

vue cli 3버전 실행화면


구분 CLI 2.X CLI 3.X
vue 설치 명령어 npm install -g vue-cli npm install -g @vue/cli
vue 프로젝트 생성 $ vue init [project_template_name] [project directory path]

템플릿 종류

  • webpack , webpack-simple, browserify, browserify-simple, simple 
$ vue create [project_name]
웹팩 설정파일 노출 O
show explicit, ex) webpack.config.js
노출 X
no show
ES6 이해도 필요 X 필요 O
node modules 자동설치 안됨 자동설치
라이브러리 추가 github 템플릿 다운로드 plugin 기반으로 기능 추가


반응형
  • 기존에 Vue 생성자 함수를 사용하는 대신에, createApp() 함수를 사용합니다.
// main.js
// 기존

import Vue from 'vue';
import App from './App.vue';

new Vue({
  render: h => h(App),
}).$mount('#app');
// main.js
// 새버전

import { createApp } from 'vue';
import App from './App.vue';
createApp(App).mount('#app');


반응형

Vue Cli 3.X 이상 일때 기준으로 Setting

1. SASS (scss)

  • node-sass, sass-loader 설치
npm install --save-dev node-sass sass-loader


  • vue.config.js 세팅 (모든 컴포넌트에 공통 스타일적용)
    • sass-loader 버전 8.X는 data가 아니고 prependData를 써줘야 한다.
    • 그 이상의 버전은 additionalData
// vue.config.js

module.exports = {
    css: {
        loaderOptions: {
            sass: {
                additionalData: `
                    @import "@/assets/scss/_reset.scss";
                    @import "@/assets/scss/_variables.scss";
                    @import "@/assets/scss/_breakpoints.scss";
                    @import "@/assets/scss/_mixins.scss";
                `
            }
        }
    }
};

2. Polyfill 

Vue 3.X 이상의 경우 ES6사용으로 인해 IE브라우저를 지원하지 않는다 
IE 지원을 위해 polyfill등의 추가 세팅이 필요
  • @babel/polyfill, @babel/preset-env 설치 
npm install --save @babel/polyfill
npm install --save-dev @babel/preset-env


  • main.js (※ 최상단에 위치할 것)
//main.js

import '@babel/polyfill'
import Vue from 'vue'


  • vue.config.js 세팅된 선언이 많을 경우 하단에 ' , ' 입력 후 이어서 붙여주기
//vue.config.js

const ansiRegex = require('ansi-regex');

module.exports = {
	transpileDependencies: [ansiRegex]
}


  • babel.config.js
// babel.config.js

module.exports = {
	presets: [
		['@babel/preset-env']
	]
}

3. vuex

  • 설치
    • 이전 버전으로 설치 했을 경우 npm uninstall --save vuex 로 이전버전 삭제 후 설치
 npm install --save vuex@next


  • main.js
// main.js

import { createApp } from 'vue'
import App from './App.vue'
import store from './store/index.js';

const app = createApp(App);

app.use(store);
app.mount('#app');


  • store폴더, index.js 파일 생성
// store/index.js

import { createStore } from 'vuex';

export default createStore({
  state: {
  },
  getters: {
    
  },
  mutations: {
  
  }
});

4. Router

  • 설치
npm i vue-router@next


  • main.js
// main.js

import { createApp } from 'vue'
import App from './App.vue'
import router from './routes/index.js';

const app = createApp(App);

app.use(router);
app.mount('#app');
import { createWebHistory, createRouter } from 'vue-router';

const routes = [
  {
    path: "/",
  },
 
];

const router = createRouter({
  history: createWebHistory(),
  routes,
});

export default router;
반응형

+ Recent posts