// Add a request interceptor
axios.interceptors.request.use(function (config) {
    // 요청보내기 전 코드
    return config;
  }, function (error) {
    // 요청에러 처리
    return Promise.reject(error);
  });

// Add a response interceptor
axios.interceptors.response.use(function (response) {
    // 응답을 받기 전에 처리
    // Any status code that lie within the range of 2xx cause this function to trigger
    // Do something with response data
    return response;
  }, function (error) {
    // 응답에러 전처리
    // Any status codes that falls outside the range of 2xx cause this function to trigger
    // Do something with response error
    return Promise.reject(error);
  });
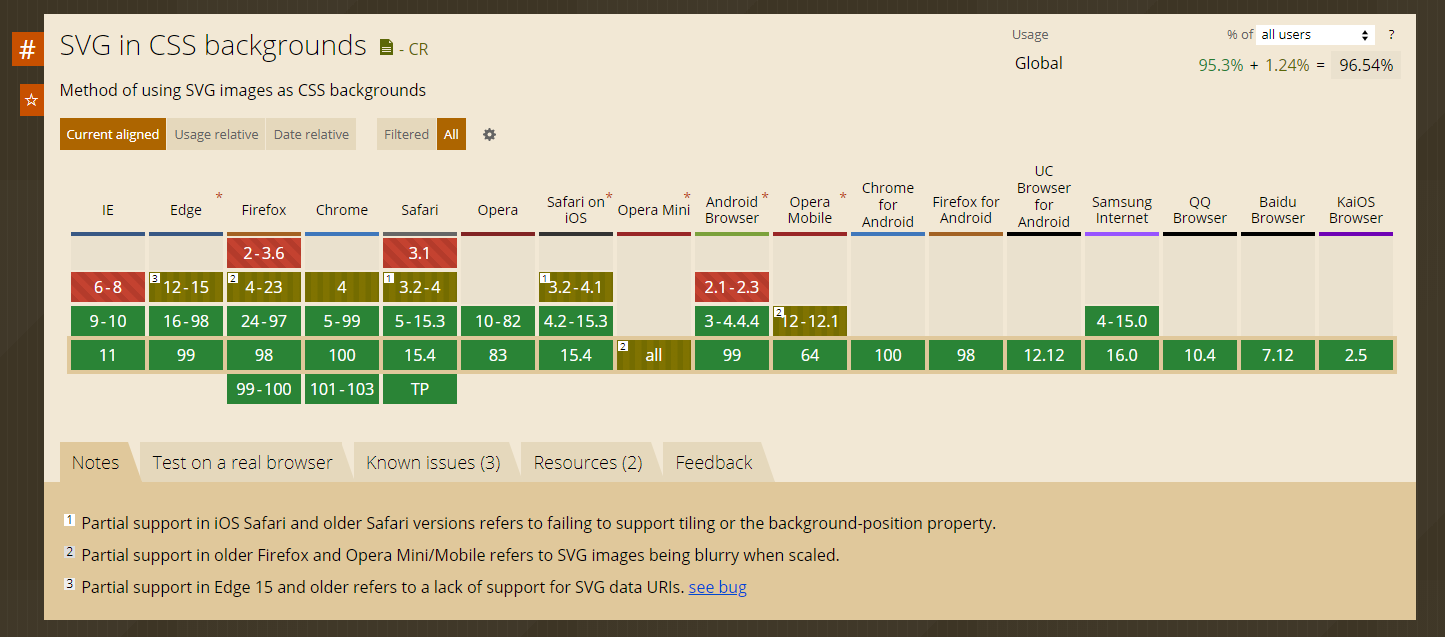
Vuex는 vue.js 애플리케이션을 위한 상태관리 라이브러리 모든 컴포넌트들에 접근가능한 데이터 저장소로 컴포넌트간 공통으로 사용되는 데이터 속성을 저장한다. Vuex는 Vue.js의 상태관리 라이브러리로 애플리케이션의 모든 컴포넌트에 대한 중앙 집중식 저장소 역할을 하며 의도적인 방법으로 상태를 변경 및 관리할 수 있다. Vuex는 기존 React의 Flux의 아키텍처를 따라가고 있고 React로 본다면 Redux와 비교 대상으로 볼 수 있다. Vue.js에서도 Redux를 사용할 수 있지만 Vue.js는 Vuex와의 호환이 좋을 뿐만 아니라 더 직관적으로 개발할 수 있다.
설치 (dependencies에 설치)
npm i vuex
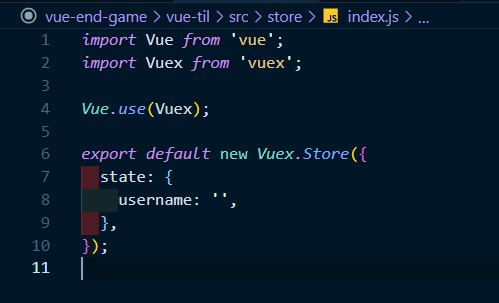
store/index.js
//store/index.js

import Vue from 'vue';
import Vuex from 'vuex';

Vue.use(Vuex);

export default new Vuex.Store({
  state: {
    username: '',
  },
});
main.js
// main.js

import Vue from 'vue';
import App from './App.vue';
import router from '@/routes/index';
import store from '@/store/index';

Vue.config.productionTip = false;

new Vue({
  render: h => h(App),
  router,
  store,
}).$mount('#app');
npm run serve
크롬 Vue개발자도구
Vuex 구조
Vuex는 state, mutations, action, getters 4가지 형태로 관리가 되며,
이때 이 관리 포인트는 store 패턴을 사용하고 통상 store라고 불린다.
이 4가지는 서로간의 간접적으로 영향이 있으며 단방향 데이터 흐름으로 볼 수 있다.
1. State
컴포넌트 간에 공유하는 데이터 = data() { ... }
Vue 컴포넌트에서 data로 볼 수 있다. 원본 소스의 역할을 하며, View와 직접적으로 연결되어있는 Model이다. 이 state는 직접적인 변경은 불가능하고 mutation을 통해서만 변경이 가능하다. mutation을 통해 state가 변경이 일어나면 반응적으로 View가 업데이트된다.
2. Mutations
동기로직
state를 변경하는 유일한 방법이고 이벤트와 유사하다. mutation은 함수로 구현되며 첫 번째 인자는 state를 받을 수 있으며, 두 번째 인자는 payload를 받을 수 있다. 여기서 payload는 여러 필드를 포함할 수 있는 객체형태도 가능하다. 이 mutation은 일반적으로(Helper를 쓰지 않는 경우)는 직접 호출을 할 수 없으며, commit을 통해서만 호출할 수 있다.
3. Actions
비동기 로직 = axios
Action은 mutation과 비슷하지만 mutation과는 달리 비동기 작업이 가능하다. 또한 mutation에 대한 commit이 가능하여 action에서도 mutation을 통해 state를 변경할 수 있다.
action에서는 첫 번째 인자를 context 인자로 받을 수 있으며 이 context에는 state, commit, dispatch, rootstate와 같은 속성들을 포함한다. 두 번째 인자는 mutation과 동일하게 payload로 받을 수 있다.
commit을 통해 mutation을 호출했다면 Action은 dispatch를 통해서 호출한다. context의 속성을 보면 dispatch가 있는 것으로 보아 action에서는 서로 다른 action을 호출할 수 있다는 것을 볼 수 있다.
4. Getters
중복된 데이터 처리
Getters는 쉽게 Vue 컴포넌트에서 Computed로 볼 수 있다.
말로 풀자면 계산된 속성인데 getter의 결과는 종속성에 따라 캐시 되고 일부 종속성이 변경된 경우에만 다시 재계산된다.
즉, 특정 state에 대해 어떠한 연산을 하고 그 결과를 View에 바인딩할 수 있으며, state의 변경 여부에 따라 getter는 재계산이 되고 View 역시 업데이트를 일으킨다. 이때 state는 원본 데이터로서 변경이 일어나지 않는다.